
Curry puffs are one of those snacks that look a little complicated when you first see them, but they’re actually quite manageable once you break the recipe down into a few simple steps.
You can make the pastry from scratch, prepare the filling ahead of time, and then assemble everything when you’re ready to bake.
These homemade curry puffs are perfect for an afternoon snack, a party appetizer, lunchbox treat, or even a light dinner with a simple salad on the side.
The best part is that you can adjust the filling to your taste. Use ground chicken, beef, or even make a completely vegetarian version with extra potatoes and vegetables.
Let’s get started.
Table of Contents
Why You’ll Love These Curry Puffs?
These curry puffs have a crisp, buttery pastry and a flavorful filling without requiring a long list of unusual ingredients.
The filling is cooked separately before it goes into the pastry, which means you don’t have to worry about raw meat cooking inside the puff. Once they’re assembled, the oven only needs to brown and crisp the pastry.
They’re also great for making ahead. You can prepare the filling earlier in the day and keep it refrigerated until you’re ready to assemble the puffs.
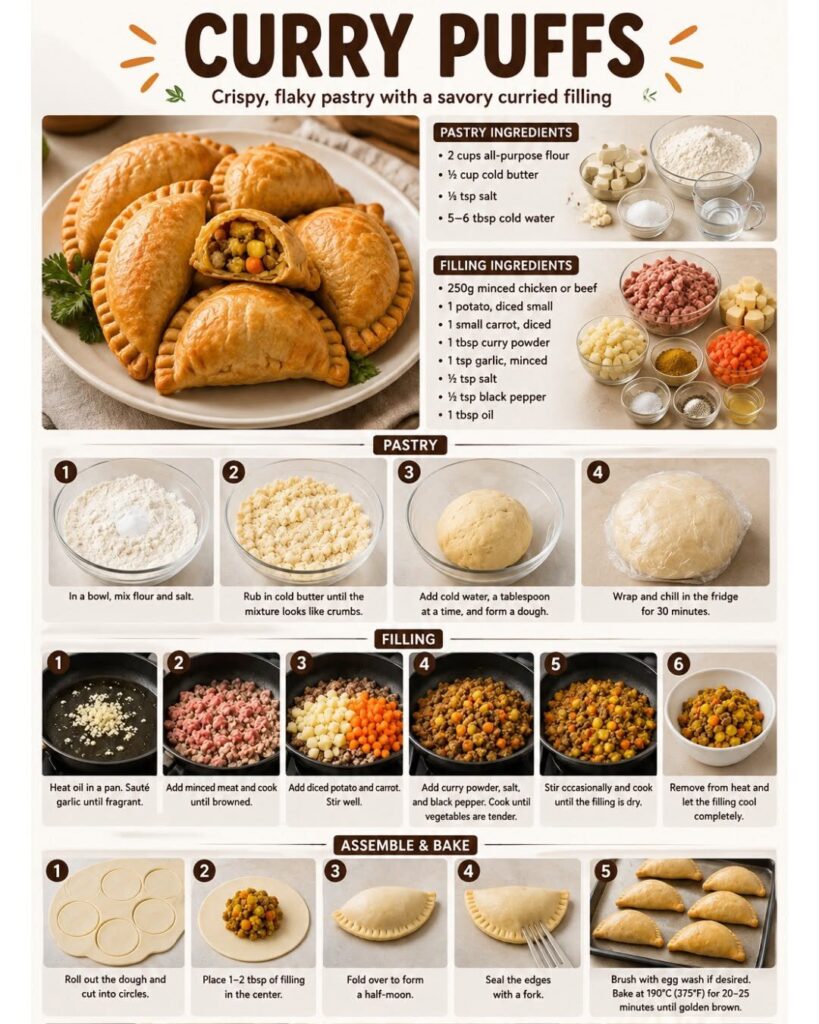
Ingredients You’ll Need:
For the Pastry
- 2 cups all-purpose flour
- ½ cup cold butter
- ½ teaspoon salt
- 5–6 tablespoons cold water
For the Curry Filling
- 250g ground chicken or beef
- 1 small potato, peeled and diced
- 1 small carrot, finely diced
- 1 tablespoon curry powder
- 1 tablespoon minced garlic
- ½ teaspoon salt
- ½ teaspoon black pepper
- 1 tablespoon cooking oil
You can also add peas, corn, onions, or other vegetables if you have them available.
For Brushing
- 1 beaten egg, optional
The egg wash gives the pastry a beautiful golden-brown finish. If you don’t want to use egg, you can simply brush the pastry lightly with milk or leave it unwashed.
How to Make Curry Puffs:
1. Prepare the Pastry Ingredients
Start by measuring your flour and salt into a large mixing bowl.
Add the cold butter in small pieces. It’s important that the butter stays cold at this stage. Cold butter helps create those little pockets in the dough that eventually give the pastry its flaky texture.
Using your fingertips, rub the butter into the flour until the mixture looks crumbly.
Don’t worry if you still see a few tiny pieces of butter. That’s actually a good thing. You don’t want to completely blend the butter into the flour.
2. Make the Dough
Slowly add the cold water, one tablespoon at a time, while gently mixing.
You may not need all of the water, so don’t pour it in all at once.
The dough should eventually come together into a soft ball. It shouldn’t be extremely wet or sticky.
Once the dough comes together, gently knead it for a minute or two. You don’t need to knead it like bread dough. Overworking pastry can make it tough instead of tender and flaky.
Wrap the dough and place it in the refrigerator for about 30 minutes.
This resting time is important because it allows the dough to relax and makes it much easier to roll later.
3. Cook the Curry Filling
While the dough is chilling, prepare the filling.
Heat one tablespoon of oil in a large skillet over medium heat.
Add the minced garlic and cook for about 30 seconds, just until it becomes fragrant.
Next, add the ground chicken or beef.
Break the meat apart with a wooden spoon and cook until it is browned and no longer pink.
Take your time with this step. You want the meat to develop a little color because that adds more flavor to the filling.
4. Add the Vegetables and Seasonings
Once the meat is browned, add the diced potato and carrot.
Stir everything together and cook for a few minutes.
Then add the curry powder, salt, and black pepper.
The curry powder is what gives the filling its warm, slightly spicy flavor, but you can adjust the amount depending on how strong you like your curry.
If you enjoy a little heat, you can also add a pinch of chili flakes or a finely chopped fresh chili.
Add a small splash of water if the mixture looks too dry, then cover the pan and allow the vegetables to cook until tender.
5. Cook the Filling Until Dry
This step is easy to overlook, but it makes a big difference.
The curry filling should not be watery when you put it inside the pastry.
Continue cooking uncovered for a few minutes, stirring occasionally, until most of the moisture has evaporated.
The potatoes and carrots should be tender, and the filling should look thick enough to sit on a spoon without running.
Once it’s ready, remove the pan from the heat and allow the filling to cool completely.
Don’t try to fill the pastry while the filling is still hot. Hot filling can soften the pastry and make it much harder to seal properly.
6. Roll Out the Dough
Take the chilled dough out of the refrigerator and place it on a lightly floured surface.
Divide it into smaller portions if that makes it easier to work with.
Roll each portion out until it’s relatively thin but still sturdy enough to hold the filling.
You don’t want the pastry paper-thin because it can tear when you add the filling. At the same time, very thick dough can make the curry puffs heavy rather than light and flaky.
Use a round cutter, small bowl, or glass to cut circles from the dough.
Try to keep the circles similar in size so that the curry puffs bake evenly.
7. Add the Curry Filling
Place one to two tablespoons of the cooled filling in the center of each pastry circle.
Don’t overfill them.
It can be tempting to add as much filling as possible, but an overloaded curry puff is difficult to close and may burst open during baking.
Leave some space around the edges of the dough.
If the edges look dusty with too much flour, gently brush off the excess. You need the pastry to stick together when you seal it.
8. Fold and Seal the Curry Puffs
Fold the dough over the filling to create a half-moon shape.
Press the edges together gently with your fingers first.
Then use a fork to press around the edges. This seals the curry puff and also creates the classic decorative pattern around the outside.
If you want a more traditional-looking finish, you can also create a simple crimped edge with your fingers.
Take your time here. A good seal is important because it prevents the filling from leaking out while the curry puffs bake.
9. Brush and Bake
Preheat your oven to 375°F (190°C).
Arrange the finished curry puffs on a baking sheet lined with parchment paper.
If you’re using an egg wash, lightly brush the tops with beaten egg.
You don’t need a thick coating. A thin layer is enough to give the pastry a beautiful golden color.
Bake for approximately 20–25 minutes, or until the curry puffs are puffed and golden brown.
Keep an eye on them during the last few minutes because ovens can vary.
The exact baking time may also depend on how thin you rolled your pastry and how large your curry puffs are.
10. Cool Slightly and Serve
When the curry puffs are golden brown, remove them from the oven and let them cool for a few minutes.
Try not to eat one immediately—the filling will be extremely hot inside.
After a short cooling period, they’re ready to serve.
The pastry should be crisp and flaky, while the filling should be warm, savory, and packed with curry flavor.
They’re delicious on their own, but you can also serve them with sweet chili sauce, spicy dipping sauce, or a simple cucumber salad.
Tips for Making the Best Curry Puffs
Keep the butter cold
Cold butter is one of the secrets to flaky pastry. If your kitchen is warm and the dough starts feeling greasy or soft, put it back in the refrigerator for a few minutes before continuing.
Don’t add hot filling
Always allow the filling to cool before assembling the curry puffs. Hot filling can soften the dough and make it difficult to seal.
Don’t overfill
A little filling goes a long way. Overfilling can cause the pastry to split open while baking.
Keep the dough covered
If you’re making several batches, cover the dough pieces you’re not currently using. Exposed dough can dry out quickly and become difficult to seal.
Make sure the filling isn’t watery
This is probably one of the most important tips. A wet filling can make the bottom of the pastry soggy and can cause the curry puff to burst.
Can I Make Curry Puffs Ahead of Time?
Yes, and that’s one of the reasons I love this recipe.
You can prepare the curry filling a day ahead and store it in an airtight container in the refrigerator.
You can also assemble the curry puffs several hours before baking. Keep them covered and refrigerated until you’re ready to put them in the oven.
If you’re making a large batch for a party, this can save you quite a bit of time.
You can even freeze unbaked curry puffs. Arrange them on a tray and freeze until firm, then transfer them to a freezer-safe container or bag.
When you’re ready to bake them, you can bake them directly from frozen, although they may need a little extra time in the oven.
How to Store Leftover Curry Puffs
If you happen to have leftovers, allow them to cool completely before storing them in an airtight container.
Keep them refrigerated and enjoy them within a few days.
For the best texture, reheat them in an oven or air fryer rather than a microwave. The oven helps bring the crispiness back to the pastry.
A microwave will warm them quickly, but the pastry can become soft.
Easy Variations to Try
The filling is very easy to customize.
For a chicken curry puff, use ground chicken as the recipe suggests.
For a richer version, try ground beef with the same seasonings.
For a vegetarian curry puff, skip the meat and increase the amount of potato, carrot, and peas.
You can also add sweet potatoes, corn, mushrooms, or finely chopped bell peppers.
If you like spicy food, add chili flakes, cayenne pepper, or fresh chopped chili to the filling.
You can even experiment with different curry powders to change the overall flavor.
What to Serve With Curry Puffs
Curry puffs are great as a snack, but they can also be part of a larger meal.
Serve them with a simple green salad for a lighter option.
For dipping, sweet chili sauce works particularly well because its sweetness balances the savory curry filling.
You could also serve them with a spicy tomato chutney, yogurt-based dip, or your favorite hot sauce.
They’re especially nice alongside a cup of tea or coffee for an afternoon snack.
Final Thoughts
Homemade curry puffs might look like a recipe that takes a lot of effort, but once you separate the process into three simple parts—making the pastry, cooking the filling, and assembling the puffs—the recipe becomes much easier to manage.
The most important things to remember are to keep your pastry cold, cook the filling until it’s fairly dry, let the filling cool before assembling, and avoid overfilling the pastry.
Once you make them once, you’ll probably get much faster at shaping and sealing them.
And the reward is worth it: crisp, golden pastry wrapped around a warm, flavorful curry filling.
They’re perfect for sharing, but don’t be surprised if a few disappear from the baking tray before you even get them to the table.